 Pay with Amazon is a payment service provided by Amazon Payments Europe S.C.A..
Millions of customers have an Amazon account with stored shipping addresses and payment methods. This checkout process allows your customers to login using their Amazon account, retrieve their Amazon shipping addresses and pay with one of the payment methods stored in their Amazon account.
Register your seller account at payments.amazon.co.uk for a GBP account.
Register your seller account at payments.amazon.de for a EUR account.
Hosting Requirements
- VirtueMart version 2.6.16 or above and 3.0.6 and above
- cURL for PHP
- DOM/XML for PHP
Configuring Pay With Amazon in VirtueMart
Account Parameters
Environments
- Sandbox: the sandbox mode helps you to test the payment method, and to simulate the buyer experience as well as the merchant experience to better understand how the payment behaves. In sandbox mode, you can also simulate decline handling.
This mode is not suitable for a live store and you should avoid displaying a sandbox experience to buyers. - Live: select this option to set your shop into live mode to actually receive orders and payments.
Region
Select the country of the merchant's Amazon payment account.
Multilingual website: the button Pay With Amazon is only displayed if the shopper is browsing the website in the language of the country the seller has been registered.
Seller Id
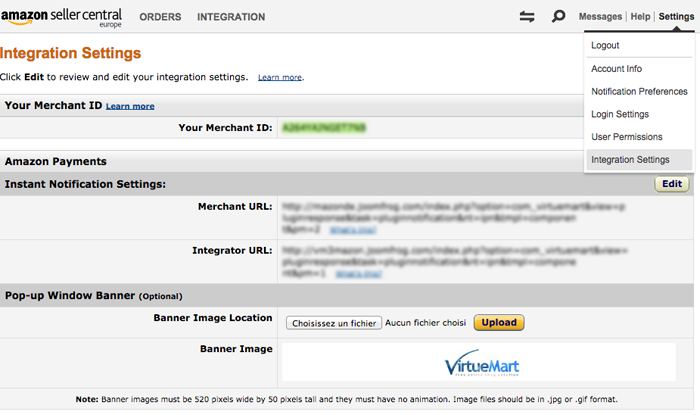
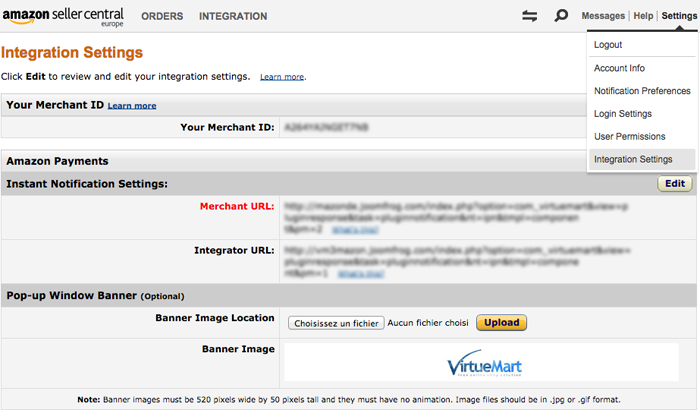
Your Merchant ID (Seller ID) is your unique identifier for all your transactions. You can find your Merchant ID in SellerCentral.
- Go to Amazon SellerCentral.
- Click on Settings which is on the top right of the page.
- Click on Integration Settings.
- Copy the Merchant ID from Amazon SellerCentral.
Access Key and Secret key
Fill these fields with your Amazon payment credentials. You can find the credentials in Amazon SellerCentral.
The Secret Access Key is used to calculate the signature included in the API requests. You must keep this Access Key secret, and never give it away. The same keys are use for the Sandbox and the live environment.
- Go to Amazon SellerCentral.
- Click on the link Integration.
- Click on MWS Access Key
- Generate your MWS Access Key
- Copy/paste the Access key ID and Secret Access Key.
You can generate your MWS access keys in SellerCentral. Please go to “Integration / MWS Access Key”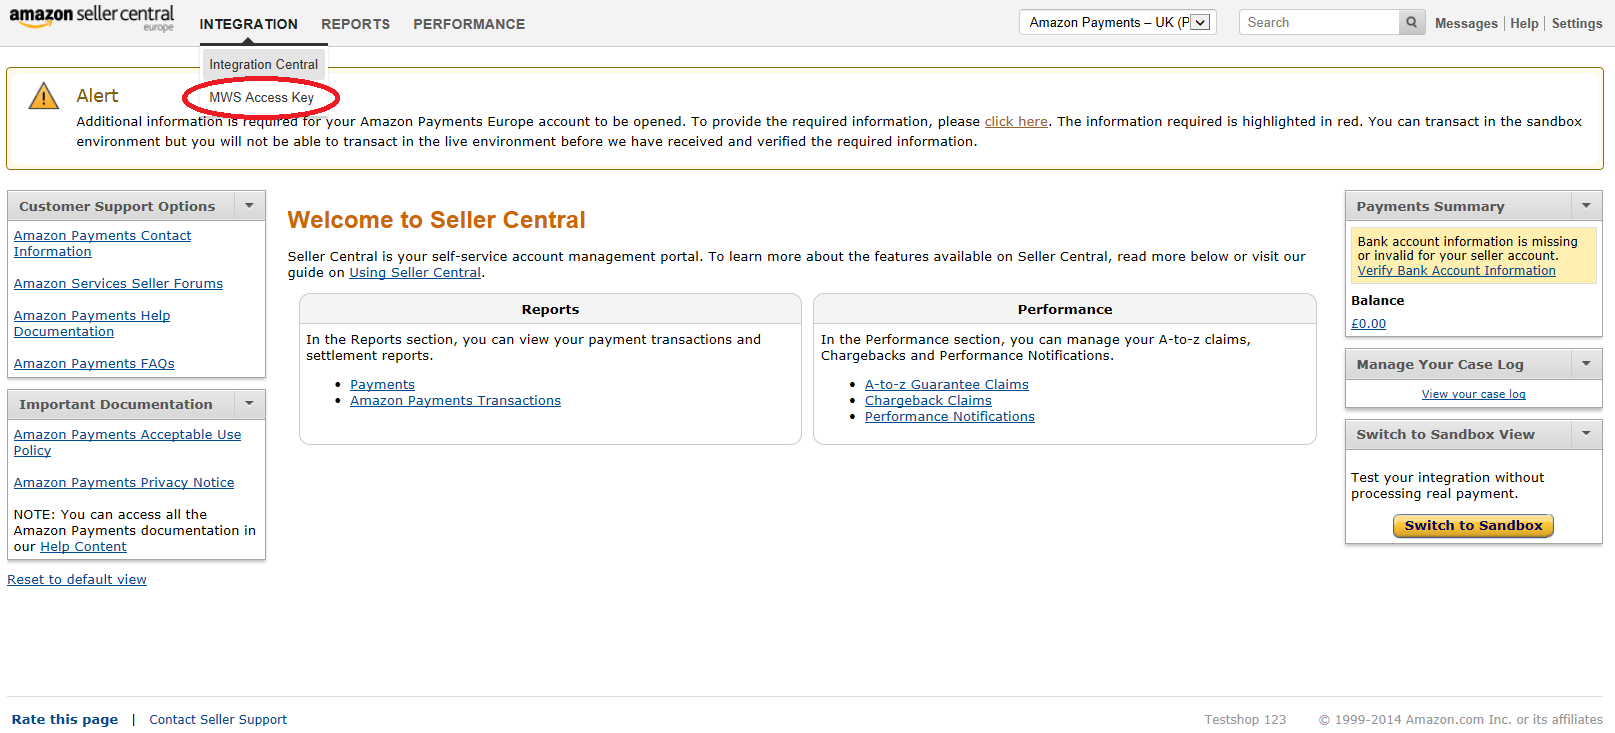
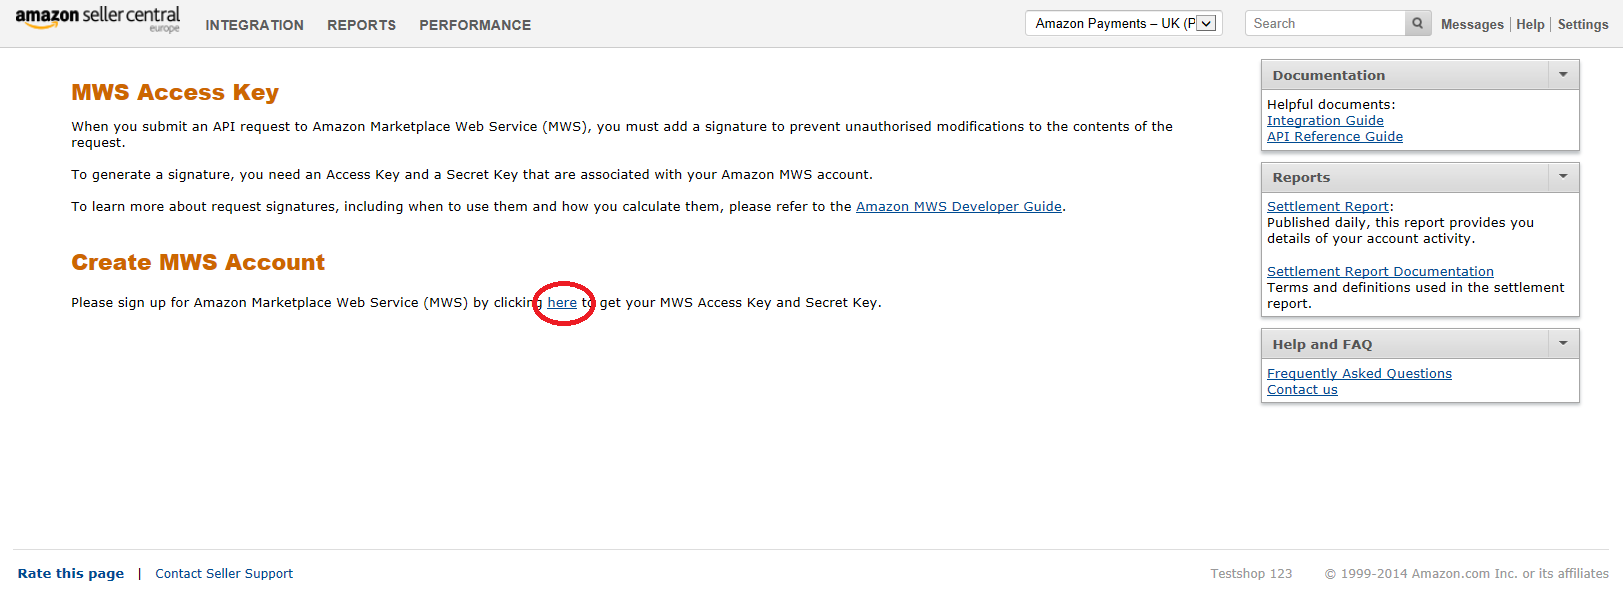
Log in again with your Amazon Payments account credentials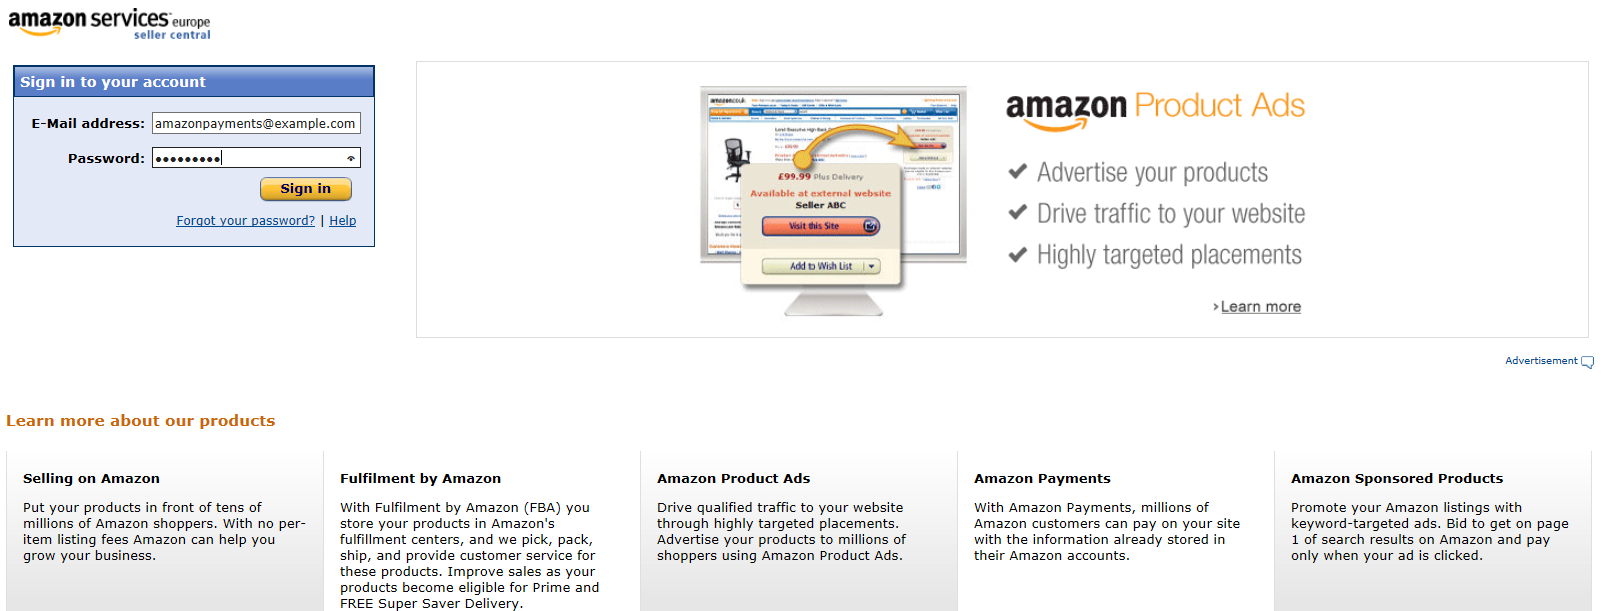
Make sure that you register the MWS Access Key for your own account.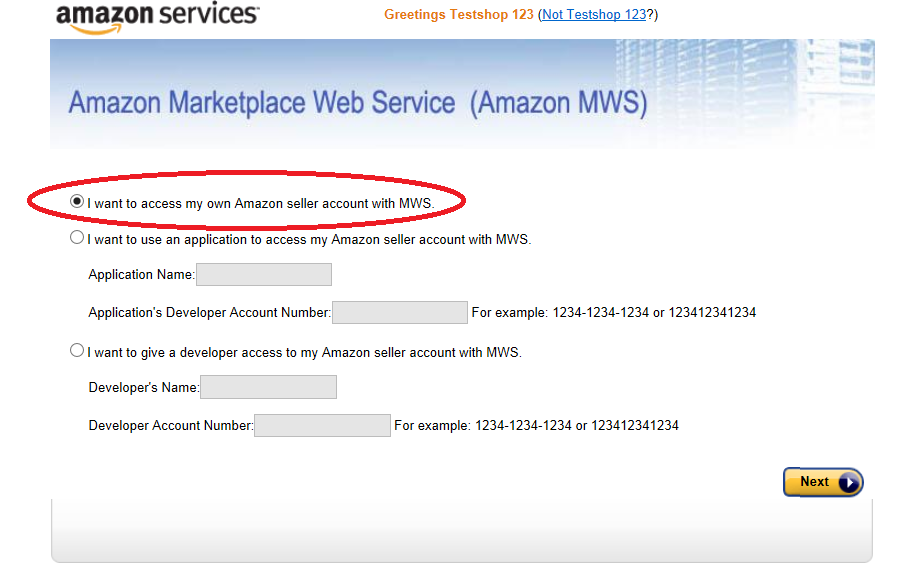
Please read and accept the license agreement.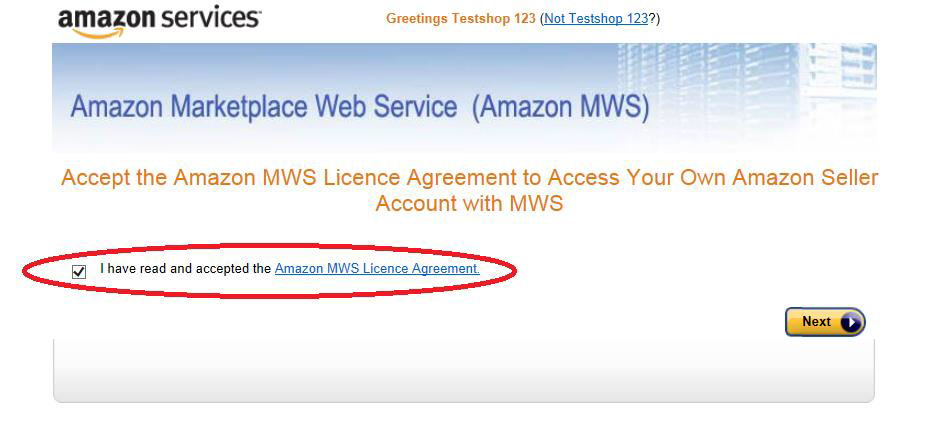
The Access Key ID and the Secret Key, together with the merchant id, will be presented to you on the next page. You can always review the key information in SellerCentral on the “Integration / MWS Access Key” page.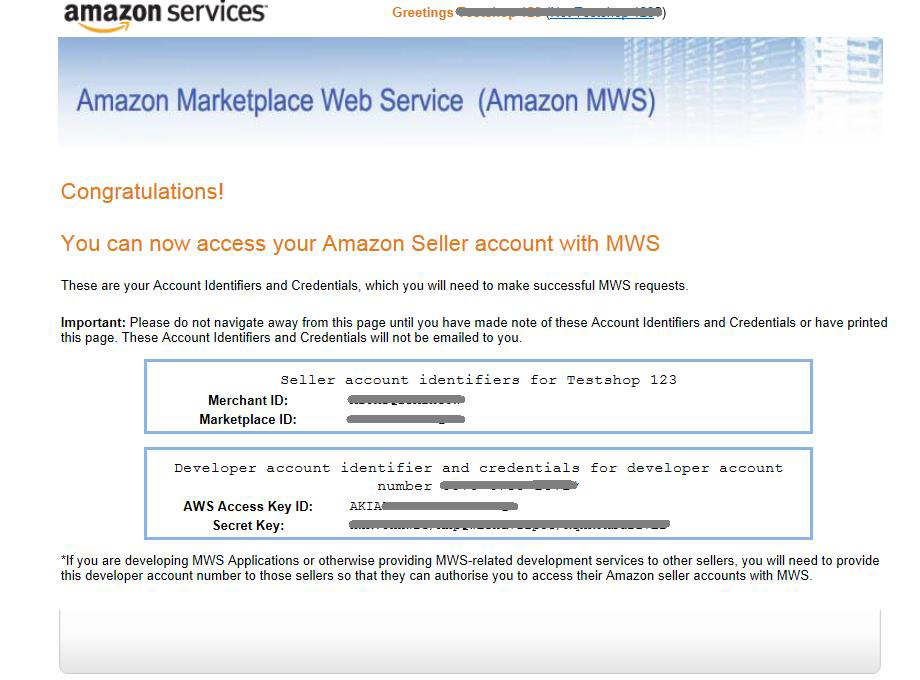
Account Options
ERP Mode
If you are using an ERP, you can let your ERP synchronise your order management.
- Enabled: the ERP synchronises the order management.
- Disabled: VirtueMart synchronises the order management.
Authorization Mode
If you have enabled the ERP mode, three options are available:
- Synchronous: An authorization request is sent to Amazon, which returns the authorization status in real time.
- Asynchronous: In asynchronous mode, Amazon does not process the authorization in real time. VirtueMart sends an authorization request to Amazon and the IPN will return the final process status.
- Done by ERP: turns off all automated authorization and capture functionality as well as IPN reception and/or polling, and disables any admin UI functionality that may trigger authorizations or captures.
If you have disabled the ERP mode, two options are available:
- Synchronous: An authorization request is sent to Amazon, which returns the authorization status in real time.
- Asynchronous: In asynchronous mode, Amazon does not process the authorization in real time. VirtueMart sends an authorization request to Amazon and the IPN will return the final process status.
Capture Mode
- Immediate Capture: the payment is directly captured once the shopper has confirmed his order.
- Capture Delayed: the amount will be captured in VirtueMart's administration, when the merchant sets the order status to Capture transaction. The Capture should be linked to the shipping of the order
If you want to use the option Immediate Capture, it is mandatory that you get white-listed by Amazon Payments first.
IPN Reception
IPN is the acronym for Instant Payment Notification. IPNs are used by Amazon Payments to send feedback concerning the status of each request to the shop. In case of a live environment, you must have a valid SSL certificate installed on your server. If you do not have an SSL certificate, the IPN reception should be disabled. In that case, status updates are polled by the Amazon system plugin. The polling frequency is set in the Amazon system plugin. Click on the link provided in the payment configuration.
Merchant's URL IPN
If you have selected Enabled for the IPN reception parameter, this option is displayed.
In case of a live environment, you must have a valid SSL certificate installed on your server to use IPNs.
The auto generated URL shall be entered in the Merchant URL field of the integration settings in the Amazon SellerCentral.
- Got to Amazon SellerCentral.
- Click on Settings which is on the top right of the page.
- Click on Integration Settings.
- In the same line as Instant Notification Settings: click on the Edit button
- Copy the Merchant's URL IPN from VirtueMart Amazon Payment Configuration and paste it into the Merchant URL field in the Amazon SellerCentral. You can leave the integrator URL empty.
- Click on the Update button
Banner for the Login Screen
To inform the buyer for which shop he is logging in with his Amazon account, you should upload the banner of your shop in Sellercentral (under "Settings", “Integration Settings”, “Pop-up Window Banner”, see screenshot above). Make sure you upload the banner for right environment (Production and/or Sandbox).
Order Status
Order is Confirmed
With this option you can select the status to which an order will be set after the shopper has confirmed his order.
Successful Authorization
If the capture is not done immediately, the order will be set to this status after a successful authorization.
A capture of the payment is done immediately, if the cart contains download products, or if the option Capture mode is set to Immediate.
Captured Payment
During the checkout, the order will be set to this status after a successful capture.
If the cart contains download products, or if you have set the capture mode to Immediate capture, the payment is captured immediately once the shopper has confirmed his order. In this case, the order is set to this status after a successful capture.
If you have set the capture mode to Delayed capture, when the shopper confirms his order, VirtueMart only requests an authorization from Amazon.
The payment will be captured in VirtueMart's administration, when this order status is selected.
Refund Payment
When this status is selected, a refund request is sent to Amazon.
Cancel Payment
The order is set to this status when a payment has been declined or when the seller has selected to cancel the order.
Advanced workflow settings
Soft Decline
An authorization request can be declined in case of InvalidPaymentMethod. A typical case of an InvalidPaymentMethod is when the expiration date of the credit card is no longer valid and must be updated.
If you have disabled the soft decline, the order status is set to Cancelled.
If you have enabled the soft decline option:
- Asynchronous mode: an email is sent to the shopper inviting him to visit the Amazom Payment Website, and update the payment method.
- Synchronous mode: the Wallet widget is redisplayed to the shopper, and he is allowed to select another payment method, and confirm the purchase again.
Sandbox Error Simulation
In sandbox mode, it is possible to simulate the buyer's experience as well as various error conditions. This enhances the understanding of the buyer's experience in case something goes wrong during the checkout.
Sandbox error simulation in Authorize:
- PaymentMethodNotAllowed
- AmazonClosed
- InvalidPaymentMethod
- AmazonRejected
- TransactionTimeOut
- ExpiredUnused
- Pending
Sandbox error simulation in Capture:
- PaymentMethodNotAllowed
- AmazonClosed
- InvalidPayment Method
- AmazonRejected
- TransactionTimeOut
- ExpiredUnused
- Pending
Sandbox error simulation in Refund:
- AmazonRejected
Restrictions
Minimum Amount
You can restrict the Pay with Amazon payment to a minimum order amount. If you do not enter any value, Pay With Amazon payment is available with no minimum condition. Enter the minimum amount in the vendor currency.
Maximum Amount
You can restrict the Pay with Amazon payment to a maximum order amount. If you do not enter any value, Pay With Amazon payment is available with no maximum condition. Enter the maximum amount in the vendor currency.
Categories of unsupported items
Restrictions apply to the items that can be paid using Amazon Payments (e.g. weapons). You can flag those products by adding them to the product category: Not available via Amazon Payments. This category does not need to be published. If a product of this product category is present in the cart, Pay with Amazon will not be offered to the buyer.
Supported Countries
You can restrict the Pay with Amazon payment to certain delivery countries. If you do not select any country, Pay With Amazon payment is available for all delivery countries.
IP white listing
For testing or debugging purposes, you can restrict the Pay With Amazon payment in your shop to certain IPs only. Pay with Amazon will be shown to the visitors coming from those IPs.
Enter one IP address per line.
Template
Sign In Button
Select the Button widget size and Button widget color.
Addressbook Widget and Wallet Widget
The Wallet widget is where the customer selects his payment details. Enter a width and height which fits your cart page.
The Address Book widget is where the customer select the shipping address. Enter a width and height which fits your cart page.
Debug Section
debug: if set to ON all APIs calls during the checkout are displayed on the frontend.
Log: if it is set to ON, all API calls (including IPN notifications) are saved in a log file. The log file is accessible via the menu Tools > Log. The filename is amazon.<virtuemart_paymentmethod_id>.log.php. You can preview the logs by clicking on the filename. You can also download it via FTP.
The virtuemart_paymentmethod_id is the number in the ID column in the payment listing page.
Logs should only be turned ON for debugging purposes. Errors are always logged in the file com_virtuemart.log.php. The log file is accessible via the menu Tools > Log.
State / Province / Region for United Kingdom
For United Kingdom, VirtueMart uses the Countries of the United Kingdom, but Amazon uses Counties of United Kingdom.
The best solution is to update the state list in VirtueMart.
- Go to Configuration > Countries.
- Click on the link States close to United Kingdom.
- Create new States based on Counties.
Testing your integration with the Sanbox mode
The sandbox enables you to test your integration before going live. You can create sandbox test accounts in Sellercentral (Integration -> Test accounts) and test payment transactions without sending real money or providing real financial information.
Downloadable products
Digital items are identified by a weight of 0.
Pay With Amazon checkout workflow
Pay with Amazon is not just a payment method. It is a complete checkout process, presented as a One Page Checkout.
Overview
The Pay With Amazon checkout workflow is:
- Buyer adds an item into the cart, goes to the cart page.
- Buyer clicks the Pay with Amazon button, Amazon popup appears, buyer logs in with his Amazon buyer account.

- Buyer is forwarded to the Amazon Payments-specific checkout process.
If physical goods are in the cart:
If physical goods are in the cart:
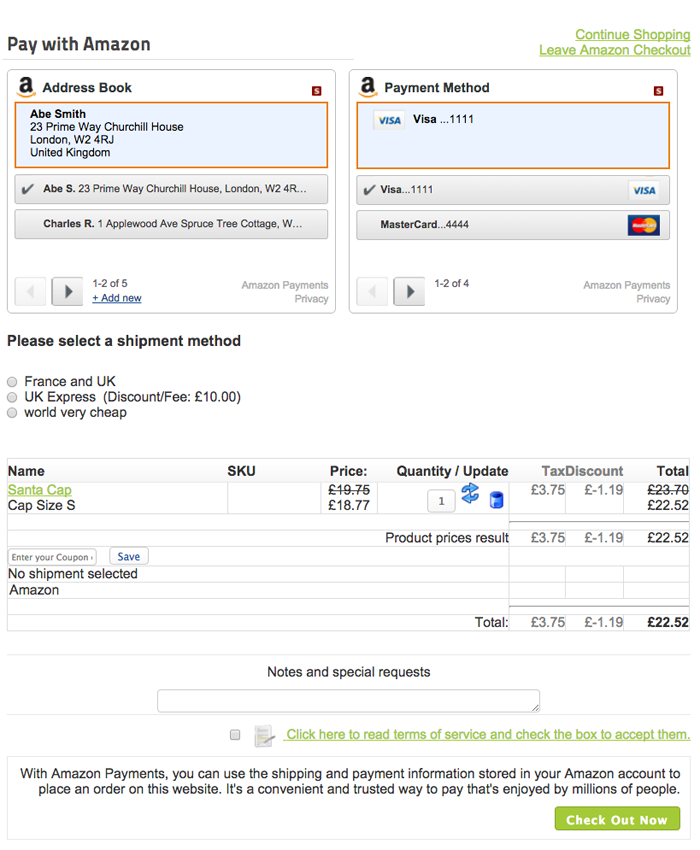
- Shop presents buyer with addressbook widget, buyer selects a delivery address in addressbook widget. The shop then requests ZIP code, city and country of the selected delivery address from the Amazon API, checks if this is a supported shipping destination and lists all supported shipping methods for the destination as well as their prices. Buyer selects a shipping method if more than one shipping method is available.
- Shop sends the transaction amount to Amazon, and displays the wallet widget; buyer selects a payment method in wallet widget.
- The buyer reviews the order and checks out.
- In case of synchronous authorization, the shop tries to authorize the order amount.
- The buyer sees the Thank you page.
If only digital goods are in the cart:
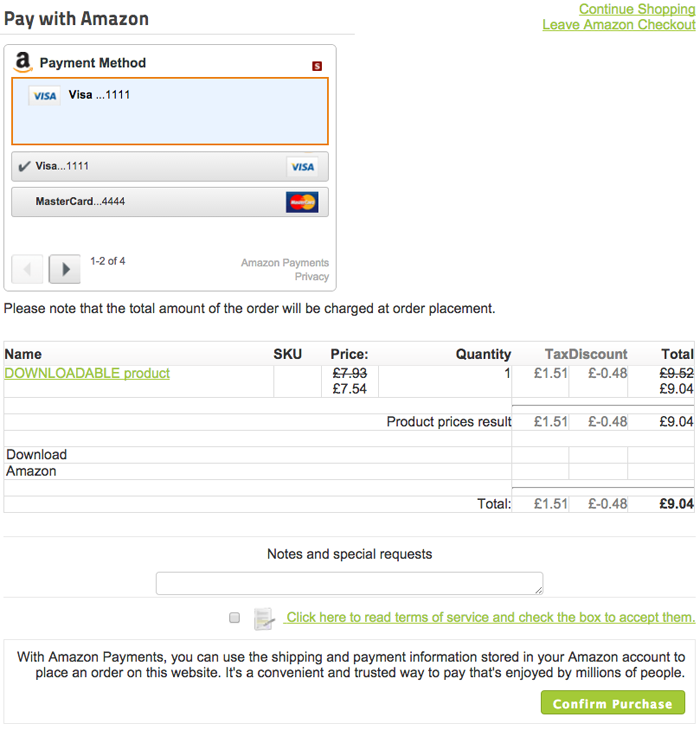
- Shop sends the transaction amount to Amazon, and displays only the wallet widget; buyer selects a payment method in the wallet widget. A note is added to the buyer to inform him that the total amount of the order will be charged at order placement.
- the buyer reviews the order, and checks out.
- In case of synchronous authorization, the shop tries to authorize the order amount.
- The buyer sees the Thank you page.
Difference between Pay with Amazon and other payment methods
Using Pay with Amazon is similar to other payment methods. There is one important difference though: Pay With Amazon returns the billing address only after a successfull authorization.
Pay With Amazon button in your template
From version 2.6.10, a new feature has been added to allow payment plugins to have their own cart template. If you are using a 3rd party template, check if it includes the payments_sign_in line.
You can also place this button anywhere in your template by adding the line mentioned in the tutorial above. Once the buyer clicks on that button, he is redirected to the Pay With Amazon checkout.
